This is one of my favorite Halloween crafts and we filled our wall with them this year.
Materials:
12”x12” scrap booking card stock
Adhesive jewel eyes (or markers)

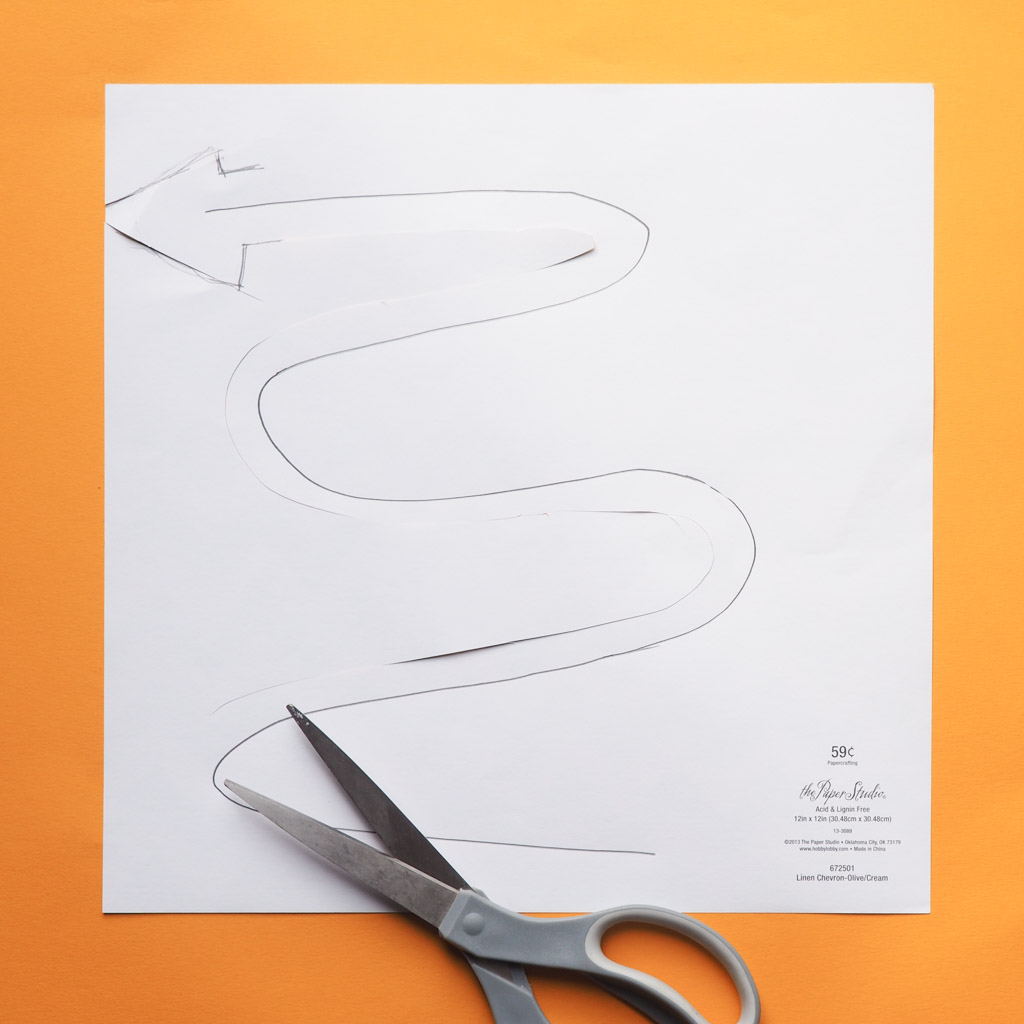
Place the card stock pattern side down on a soft surface such as a folded newspaper, pad of paper, a magazine or fun foam.
Use blunt pencil, knitting needle or a ballpoint pen to draw a curvy line that winds and curves itself starting at the top corner of the paper to the opposite corner of the paper.
On one end of the line draw a triangle shaped head.
Trim the paper ½” on both sides of the line, tapering the cut at the bottom to make the tail.
Flip the paper over and pinch along the scored line and the snake will start to curve in on its self.
Add eyes.
Attach them to the wall with removable adhesive- I like the 3M removable foam squares.
The Holiday Tradition Tree is a custom I started when my son was very little. I made several trees for work but they were never published so they floated around our home for awhile until I settled on one and it slowly became the Holiday Tree.
At Christmas it gets little ornaments, at Thanksgiving-- thankfulness leaves, at Halloween- bats (obviously) and at Easter - little chicks.
You could put any number of different things on it year round: origami birds, fabric flowers, twinkle lights etc.
Materials:
-
Branch(es) about 24" tall with lots of little twigs coming off of them
- A saw (I won mine in an Instructables contest)
-
Wood glue
-
A wood base: a wood plaque from the craft store works really well; they even have natural wood slice bases now
-
Drill and bits (size depends on branch bottom diameter)
-
Scrap wood surface to drill into (just in case)
-
Wax paper
-
Optional: Paint (spray or acrylic and a brush)
Determine the depth of the wood base - you will not need to drill through the bottom.
Gauge the diameter of the branch(es) being added to the base and select the corresponding sized drill bit.
Put a piece of painters tape around the drill bit to show how deep to drill (i.e. not all the way through the base).
In some cases, the wood bases already have a hole drilled into them for lamps but in general, it will not be the size needed to fit the bottom of the branch.
Hold the branches where they will sit and be aware that you might need to have the things balance later (i.e. put a second branch in).
On a protected surface, such as a piece of scrap wood, drill all the holes.
Set the base on wax paper and add a dab of glue into the hole.
Add a dab of glue to the branch bottom and stick it into the hole.
Repeat with the other branches if more are being used.
When the glue is completely dry, spray paint the whole tree or set your children to painting it by hand with acrylic paint.
You can paint it white (or a color) or leave it natural - both white or natural will work for all the holidays and seasons.
It's been a busy season and I barely had time to whip up anything for my favorite holiday of the year- Halloween. These are absolutely scrumptious and can be made anytime of the year but with the addition of green food coloring and candy eyes they make delicious aliens Halloween snacks.
Ingredients:
1-7 oz box Odense Almond Paste cut into slices
1/2 cup sugar plus more for dusting
1-17.03 oz box frozen Pepperidge Farm puff pastry, thawed
Sparkling sugar
Egg
Candy eyes (medium and/or varied in size)
Optional: green food coloring
Powdered ginger, cinnamon and cardamom
Directions:
Line two baking sheets with parchment paper.
Preheat oven to 375°F.
Remove one pastry sheet from the box and let sit on counter for 10 minutes.
Keep the other sheet in refrigerator.
Add the sliced almond paste and ½ cup sugar to food processor.
For green, add a bit of green food coloring at this time.
For light spices – add a 1/2 teaspoon each powdered ginger, cinnamon and cardamom.
Process until the mix is the texture of sand.
Makes about 2 cups almond sugar.
 Dust the counter with granulated sugar and unfold one pastry sheet.
Roll out to 11" X 15" with the long side, horizontal to counter.
Brush the surface with a scrambled egg.
Dust the counter with granulated sugar and unfold one pastry sheet.
Roll out to 11" X 15" with the long side, horizontal to counter.
Brush the surface with a scrambled egg.
 Scribe a line in the center of the pastry then roll the sides of pastry sheet to meet in middle.
Sprinkle the dough evenly with 1 cup of almond sugar mixture.
 Tightly roll each side so both rolls of pastry sheet touch on the scribe line.
Roll in plastic and place in freezer for 15 minutes or the refrigerator for 1 hour.
Repeat with second sheet of puff pastry.
Cut pastry into ¾” slices with a sharp knife.
Dip one side of each piece into the sparkling sugar and lay flat, sugar side up, onto parchment paper.
Tightly roll each side so both rolls of pastry sheet touch on the scribe line.
Roll in plastic and place in freezer for 15 minutes or the refrigerator for 1 hour.
Repeat with second sheet of puff pastry.
Cut pastry into ¾” slices with a sharp knife.
Dip one side of each piece into the sparkling sugar and lay flat, sugar side up, onto parchment paper.
 Bake 15-20 minutes or until golden brown.
Immediately (and carefully) add candy eyes after removing the pan from oven.
Allow to cool to room temperature.
Bake 15-20 minutes or until golden brown.
Immediately (and carefully) add candy eyes after removing the pan from oven.
Allow to cool to room temperature.
As we get closer to Halloween I'm making fast, easy projects in the 10 minute craft theme...but my secret theme is "eyes". Did you notice?
This monster fur container with googly eyes can hold silverware, straws, or even art supplies-pencils, brushes and markers. It's made from a (28 ounce tomato or any size) can or tea tin; cleaned and dried with the edges flattened down along the rim.
It's easy to get colored fur at Joann Fabrics at Halloween (not year round) but I usually buy swatches from Michael's (our local store had fuschia!).
 Cut the fake fur fabric to fit the outside of the can then hot glue the fabric in place (the can gets hot so be careful).
Add the eyes with little dabs of hot glue (not enough to melt the plastic or burn yourself).
Cut the fake fur fabric to fit the outside of the can then hot glue the fabric in place (the can gets hot so be careful).
Add the eyes with little dabs of hot glue (not enough to melt the plastic or burn yourself).

") Yes! It's another 10 minute craft! Fast, cheap and easy - these eye ball plates are quick to put together and use things you (probably) have on hand.
Yes! It's another 10 minute craft! Fast, cheap and easy - these eye ball plates are quick to put together and use things you (probably) have on hand.
 Eye Balls-10 Minute Crafts") Materials:
Materials:
9" Paper plates
Cupcake wrappers- iron them flat for easy gluing (adults job)
Black card stock
Glue stick
Red marker
3m removable foam squares or painters tape
Optional- circle punch (2") from craft store (use your coupon!)
 Eye Balls- 10 Minute Crafts") Use glue stick to add a cupcake wrapper to each plate.
Cut or punch out a black pupil and add to the center of the cupcake wrapper.
Add bloodshot lines with a red sharpie marker.
Use glue stick to add a cupcake wrapper to each plate.
Cut or punch out a black pupil and add to the center of the cupcake wrapper.
Add bloodshot lines with a red sharpie marker.
Add a foam square (or painters tape) to the back and add to the wall.


")
 Eye Balls-10 Minute Crafts")
 Eye Balls- 10 Minute Crafts")
 Eye Balls- 10 Minute Crafts")