Showing posts with label Thanksgiving. Show all posts

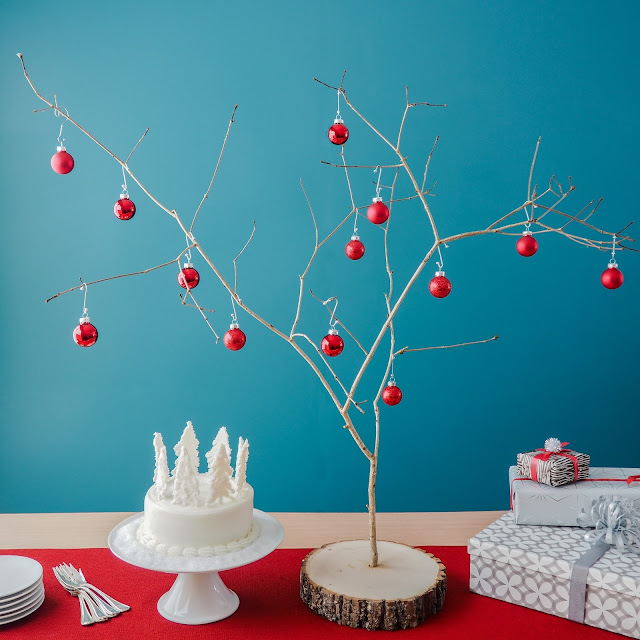
Holiday Tradition Tree

The Tiny Funnel

The Holiday Tradition Tree is a custom I started when my son was very little. I made several trees for work but they were never published so they floated around our home for awhile until I settled on one and it slowly became the Holiday Tree.

At Christmas it gets little ornaments, at Thanksgiving-- thankfulness leaves, at Halloween- bats (obviously) and at Easter - little chicks.

You could put any number of different things on it year round: origami birds, fabric flowers, twinkle lights etc.

Materials:

  • Branch(es) about 24" tall with lots of little twigs coming off of them
  •  A saw (I won mine in an Instructables contest)
  • Wood glue
  • A wood base: a wood plaque from the craft store works really well; they even have natural wood slice bases now
  • Drill and bits (size depends on branch bottom diameter)
  • Scrap wood surface to drill into (just in case)
  • Wax paper
  • Optional: Paint (spray or acrylic and a brush)

Determine the depth of the wood base - you will not need to drill through the bottom.

Gauge the diameter of the branch(es) being added to the base and select the corresponding sized drill bit.


Put a piece of painters tape around the drill bit to show how deep to drill (i.e. not all the way through the base).

In some cases, the wood bases already have a hole drilled into them for lamps but in general, it will not be the size needed to fit the bottom of the branch.
 

Hold the branches where they will sit and be aware that you might need to have the things balance later (i.e. put a second branch in).

On a protected surface, such as a piece of scrap wood, drill all the holes.
Set the base on wax paper and add a dab of glue into the hole.
Add a dab of glue to the branch bottom and stick it into the hole.


Repeat with the other branches if more are being used.

When the glue is completely dry, spray paint the whole tree or set your children to painting it by hand with acrylic paint.

You can paint it
white (or a color) or leave it natural - both white or natural will work for all the holidays and seasons.

The Tiny Funnel

Turkey Candle Votives with Washi Tape Feathers


Wishing you a Happy Thanksgiving!


I've always wanted to make washi tape feathers and this project is the perfect use for them. I have too much washi tape; someday I will show you my collection and how I store it (not on an embroidery hoop anymore).
 
Materials:
Velum (ours is gold from Michaels)
Washsi tape
Floral stems
Googly eyes
Felt – orange and red
Small glue dots OR double sided tape
Pompoms- 1” to 1.5’
Small glasses (we used our juice glasses from IKEA)
Battery operated tea lights
Optional: Parchment paper

I want to start by giving you this tip again:
Don't peel the glue dots off the paper! Touch the glue dot to the item you want to glue to and peel the base paper away.

Alternatively, you can tear a piece off (with a glue dot) from the paper roll that the dots are stuck on and use it to press the dot to the thing you want to adhere. It will peel away from the paper backing.


BUT- double sided tape works just as well (or perhaps better).

The glue dots work very well to attach the eyes, beak and snood.
Wrap a piece of scrap paper around the glass and trim it to size to make a template.
Cut as many vellum covers as you will need.
Secure the vellum on the glasses with clear tape.
 
Make the washi tape feathers using 32 gauge stem wire.
There are lots of ways to make washi tape feathers.

I suggest you make as many as you can, as quickly as possible, if you're making a lot of turkey votives.
 
Here's how I made these:

Cut the floral wires in half.
Double up the washi tape widths, as most rolls are too thin to make the feathers.

You can use the parchment paper to lay  the tape strips next to each and cut them into 4" sections.

Sandwich the floral stem between the two sticky sides.
Cut angled slits with scissors (or if you have the Martha Stewart fringe scissors --this is about the only opportunity you'll ever have to use them). 
Then cut the stems off (you don't need them).

Use glue dots or double sided tape to stick each feather to the back of the covered glass. Attach about five feathers per votive.
Curve them to look pretty.

Add two small eyes, an orange felt triangle beak and a red snood--all attached with glue dots to make the turkey head.
Then add the head to the front of the votive with glue dots.
Be enthusiastic sticking the head on so it doesn't droop.


You could use wax tea lights as nothing comes in contact with the flame but if this is for the children's table, I would definitely use battery operated tea lights.