Showing posts with label 10 minute crafts. Show all posts

Paper Snakes

This is one of my favorite Halloween crafts and we filled our wall with them this year.

Materials:
12”x12” scrap booking card stock
Adhesive jewel eyes (or markers)


Place the card stock pattern side down on a soft surface such as a folded newspaper, pad of paper, a magazine or fun foam.


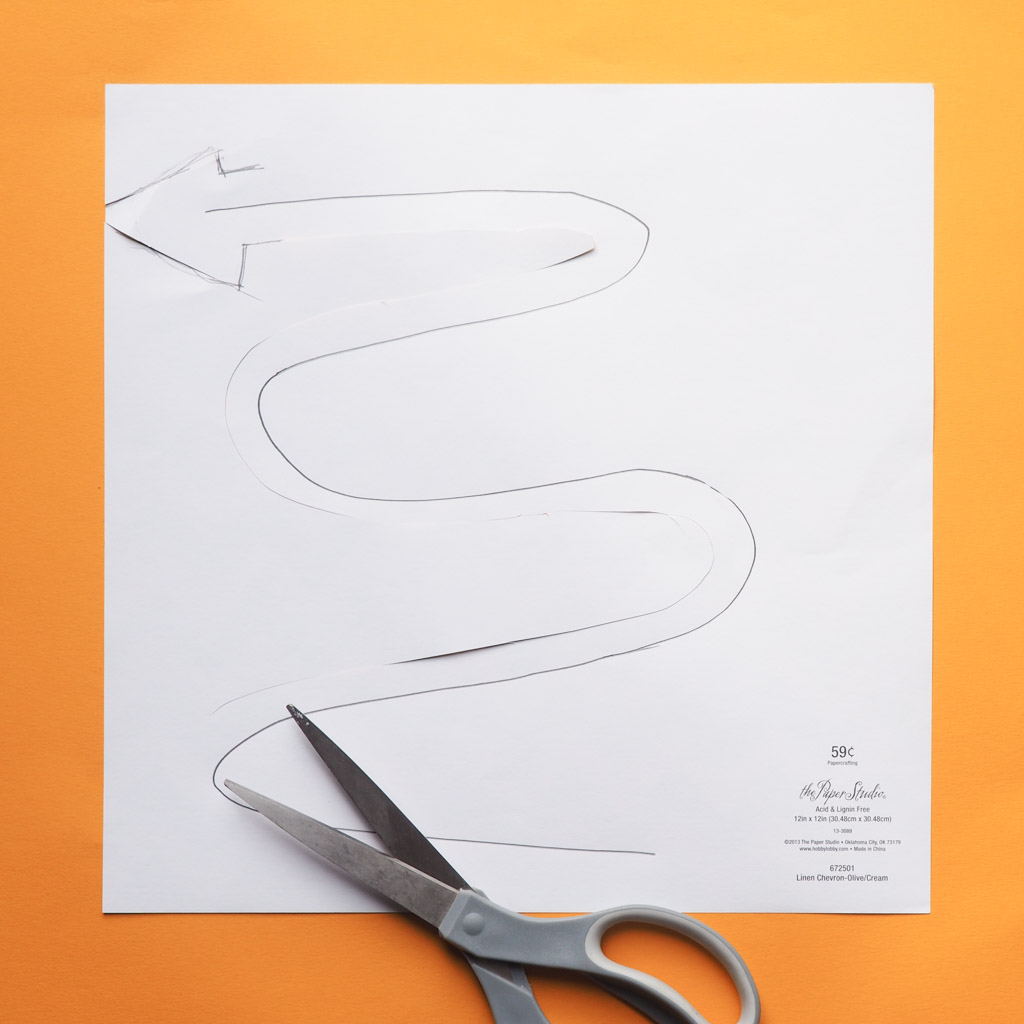
Use blunt pencil, knitting needle or a ballpoint pen to draw a curvy line that winds and curves itself starting at the top corner of the paper to the opposite corner of the paper.

On one end of the line draw a triangle shaped head. 

Trim the paper ½” on both sides of the line, tapering the cut at the bottom to make the tail.

Flip the paper over and pinch along the scored line and the snake will start to curve in on its self.


Add eyes.
Attach them to the wall with removable adhesive- I like the 3M removable foam squares.

Last minute Hoppy Valentine's Cards

Along time ago, in a distant galaxy, we made origami frog valentines for my sons class with a little chocolate tucked under each belly.

Today, simple, fast and easy and no candy.
I love my paper punches because they make projects like this easy to assemble. Punch
out the heart shape and add the printed message "Hoppy Valentine's Day!" Use glue stick to add the message and glue dots to add the plastic frogs.
Set up a production line!

The original idea included folding and stamping- very laborious and who has time right now?


Morse Code Beaded Wrap Bracelet

The Tiny Funnel
This simple Morse code necklace/bracelet is an easy gift to whip up for the holidays, Mother’s Day or a friend’s birthday.

The Tiny Funnel

Materials:
  •  3 different kinds of beads: one for dashes, one for dots and one for spaces
  • Bead Thread (3 ply) I used about 40” for my necklace/bracelet
  • Super Glue or nail polish


If you’re creating a length that’s more than four lines of prose, you’ll need at least 50” of string but if you’re making a shorter saying, such as “I love you”, consider repeating it for the full 40”.


I chose a section from TS Eliot’s Four Quartets. Your message could say anything from “I love you” to “Hey, I made this cool thing for you!”
Regardless of what you decide to say, do a search on the internet for a Morse code translator-- there are several sites out there --then copy the code words into a word document and print it out.

Create a “needle” by covering one end of the string with super glue. It should dry quickly and stiff and the beads will slide onto the string easily.
 

Add a small bit of tape at the other end of the string so the beads don’t fall off then start  adding the beads to make the message.


I lost my place after about 10 characters; I recommend crossing the characters off in sections once they are on the string.
If the string is not full when the words are done - add the “space” beads at either end of the string before tying it off.

Leave about a .25” of extra space on the string when the knot is tied so that the beads are not under tension when the length is twisted into a bracelet later.
Tie the ends in a square knot - right over left, left over right and then add a dab of super glue to the knot to secure it and trim the ends.The Tiny Funnel
The beads can be worn as a necklace or wrapped around the wrist as a bracelet. If you have more advanced jewelry making skills, add clasps and crimps on the end fastenings.

Valentines' Day Necklace

The Tiny Funnel
It’s been awhile since I put a craft up here. I’ve been busy getting ready for a little art show. But Valentines’ Day is coming and I thought it would be fun to whip up a necklace in celebration.
 

The Tiny Funnel

Materials:

Clean dry water or milk carton jug
3 (or more) small jump rings and 1 larger jump ring (I used a 10mm)
Necklace chain
Sharpie marker
Small hole punch (1/4th or 1/8th inch)
Nail polish remover (not pictured)


The Tiny Funnel
Cut a piece of plastic from the milk jug.
Trace a heart onto the plastic with the Sharpie marker and cut the heart shape.


Use the nail polish remover to remove the marker.
 

Punch a hole in one side and add a small jump ring.
Repeat with as many hearts as you want- I made 3 hearts; one each for my husband, my son and my dog.

The Tiny Funnel

Just a word about jump rings- it's best to twist the opening ends away from each other- not pull them apart. You can do this with your fingers or pliers.
Then twist them back together.


Add all the hearts to the larger jump ring and you're done!
The Tiny Funnnel

TheTiny Funnel

Contact Paper Skeleton Hands

The Tiny FunnelThese skeleton hands are easy to make and you can put them almost anywhere. I made toilet tentacles for work this year- sometimes it’s hard to find black contact paper; this craft uses white contact paper which is easier to find. 

The Tiny Funnel

Materials:

Contact paper
Glue stick
Scissors
Some kind of template- you can do a search on the internet for "skeleton hand templates" and find all kinds or draw one yourself.


Lightly use glue-stick to attach the template to the back of the contact paper and cut the shape out.


Gently peel the template paper off and re-glue it FRONT SIDE DOWN to the back of a second piece of contact paper (so you have opposite hands).
Peel the paper backing off the contact paper and stick it to a clean dry surface.


Of course! Use common sense- don’t stick it a priceless heirloom but the fridge, a mirror or a door all work well. 


The Tiny Funnel 

Halloween Eye Can!


The Tiny Funnel
As we get closer to Halloween I'm making fast, easy projects in the 10 minute craft theme...but my secret theme is "eyes". Did you notice?

This monster fur container with googly eyes can hold silverware, straws, or even art supplies-pencils, brushes and markers. It's made from a (28 ounce tomato or any size) can or tea tin; cleaned and dried with the edges flattened down along the rim.

It's easy to get colored fur at Joann Fabrics at Halloween (not year round) but I usually buy swatches from Michael's (our local store had fuschia!).

Cut the fake fur fabric to fit the outside of the can then hot glue the fabric in place (the can gets hot so be careful). 

Add the eyes with little dabs of hot glue (not enough to melt the plastic or burn yourself).
The Tiny Funnel

Halloween Paper Plate and Cupcake Wrapper Eye Balls

The Tiny FunnelYes! It's another 10 minute craft! Fast, cheap and easy - these eye ball plates are quick to put together and use things you (probably) have on hand.
The Tiny Funnel Materials:
9" Paper plates
Cupcake wrappers- iron them flat for easy gluing
(adults job) 
Black card stock
Glue stick

Red marker
3m removable foam squares or painters tape

Optional- circle punch (2") from craft store (use your coupon!)
 

The Tiny Funnel

Use glue stick to add a cupcake wrapper to each plate.
Cut or punch out a black pupil and add to the center of the cupcake wrapper.
Add bloodshot lines with a red sharpie marker.
Add a foam square (or painters tape) to the back and add to the wall.


TheTiny Funnel

Magnetic Eyes

The Tiny Funnel
I admit it, I really love googly eyes. This craft is so easy- the trick is to use a glue that doesn't pull away from the plastic and so it's trusty E6000 for the job!

Put them on a door- if you have metal one, lockers, a refrigerator or a metal bulletin board.

The Tiny FunnelMaterials:
Google eyes 
Magnets
E6000 glue
Wax paper

Work on a piece of wax paper.
Glue the eyes to the magnets.
Allow the glue to dry completely.
That's it!

The Tiny Funnel