Showing posts with label washi tape. Show all posts

Washi Tape Storage

A little more than a month I had CMC (Basal Joint) Arthroplasty - Thumb Joint Reconstruction. Hence no crafts or snacks posted since December.

In the meantime, I thought I'd share some of the ways I've come to organize the WAYYYYY too many craft supplies I have. At one time I used an embroidery hoop to store more washi tapes but - it turned out to be annoying to use – so much fiddling to get the rolls off.
I much prefer this method: the Swing-Arm Pant Hanger and have used it for over 2 years. When I want tape I just cut a length off - or if I need to- I can easily remove the roll. You can find the hanger at Target and the Container Store (and probably other places but that's where I got mine).


The Tiny Funnel

Easter Egg Garland

The Tiny FunnelThis year’s Easter garland is brought to you by recycled milk and water jugs. I really liked working with the milk container plastic at Christmas and decided to use it for this project. It’s easy to cut, translucent and uses something we already have.


The Tiny Funnel

Materials:
  • Water, milk or juice jug
  • Washi tape
  • Oval template (or you can use a punch if you have one)
  • Marker
  • Scissors
  • Thick needle with a sharp point
  • Cord (not twisted string)

  1. Cut the panels from a container- clean any packaging off (oil and baking soda or Goo Gone).
  2. Trace the oval onto the plastic and cut the shape out (or use the punch).
  3. Add washi tape strips to the oval.
  4. Pre-pierce 2 holes near the top of the "egg" with a thick sharp needle.
  5. Then add the cord through the holes (yes, pierce first then string).
The cord (left) doesn't unravel like string (right).

You could also string the eggs individually to hang on a tree or in a window.


Recycled Plastic and Washi Tape Ornaments

The Tiny Funnel
The Tiny Funnel
If you didn’t know – I’m a big recycler- makes my family a little crazy. I also use a lot of recyclables in my crafts and clear plastic salad containers are one of my favorites. I use vegetable oil (soak then wash with hot water and detergent, dry and use rubbing alcohol on the residue) to get the labels off but I’ve read that a lot of people use a combination of coconut oil and baking soda (Google it)…or in a pinch there’s always Goo Be Gone.
 
AND I love washi tape and have an embarrassingly large collection that I never do anything with but look at…it‘s like candy for the eyes. So today’s ornament is a win-win!
Materials:
Clear clean light weight plastic – salad containers, clear cookie containers – lids on the candy containers from Trader Joes etc.
Washi tape
Push pin for making a hole for hanging (maybe an eye)
 

Cut the plastic out of the container- or the edges off the lid so that the plastic will lay flat.
Lay down strips of washi tape on the dry clean plastic. 
Make a paper template of the shape that will be cut out if it’s more complicated than just a circle (trace around a jar or can).
Transfer the shape to the tape covered plastic.
Cut out the shape and poke a hole to hang the ornament. 
Add a little sparkly tape to the top of the circle as the ornament hanger.
The Tiny Funnel

The Tiny Funnel


Turkey Candle Votives with Washi Tape Feathers


Wishing you a Happy Thanksgiving!


I've always wanted to make washi tape feathers and this project is the perfect use for them. I have too much washi tape; someday I will show you my collection and how I store it (not on an embroidery hoop anymore).
 
Materials:
Velum (ours is gold from Michaels)
Washsi tape
Floral stems
Googly eyes
Felt – orange and red
Small glue dots OR double sided tape
Pompoms- 1” to 1.5’
Small glasses (we used our juice glasses from IKEA)
Battery operated tea lights
Optional: Parchment paper

I want to start by giving you this tip again:
Don't peel the glue dots off the paper! Touch the glue dot to the item you want to glue to and peel the base paper away.

Alternatively, you can tear a piece off (with a glue dot) from the paper roll that the dots are stuck on and use it to press the dot to the thing you want to adhere. It will peel away from the paper backing.


BUT- double sided tape works just as well (or perhaps better).

The glue dots work very well to attach the eyes, beak and snood.
Wrap a piece of scrap paper around the glass and trim it to size to make a template.
Cut as many vellum covers as you will need.
Secure the vellum on the glasses with clear tape.
 
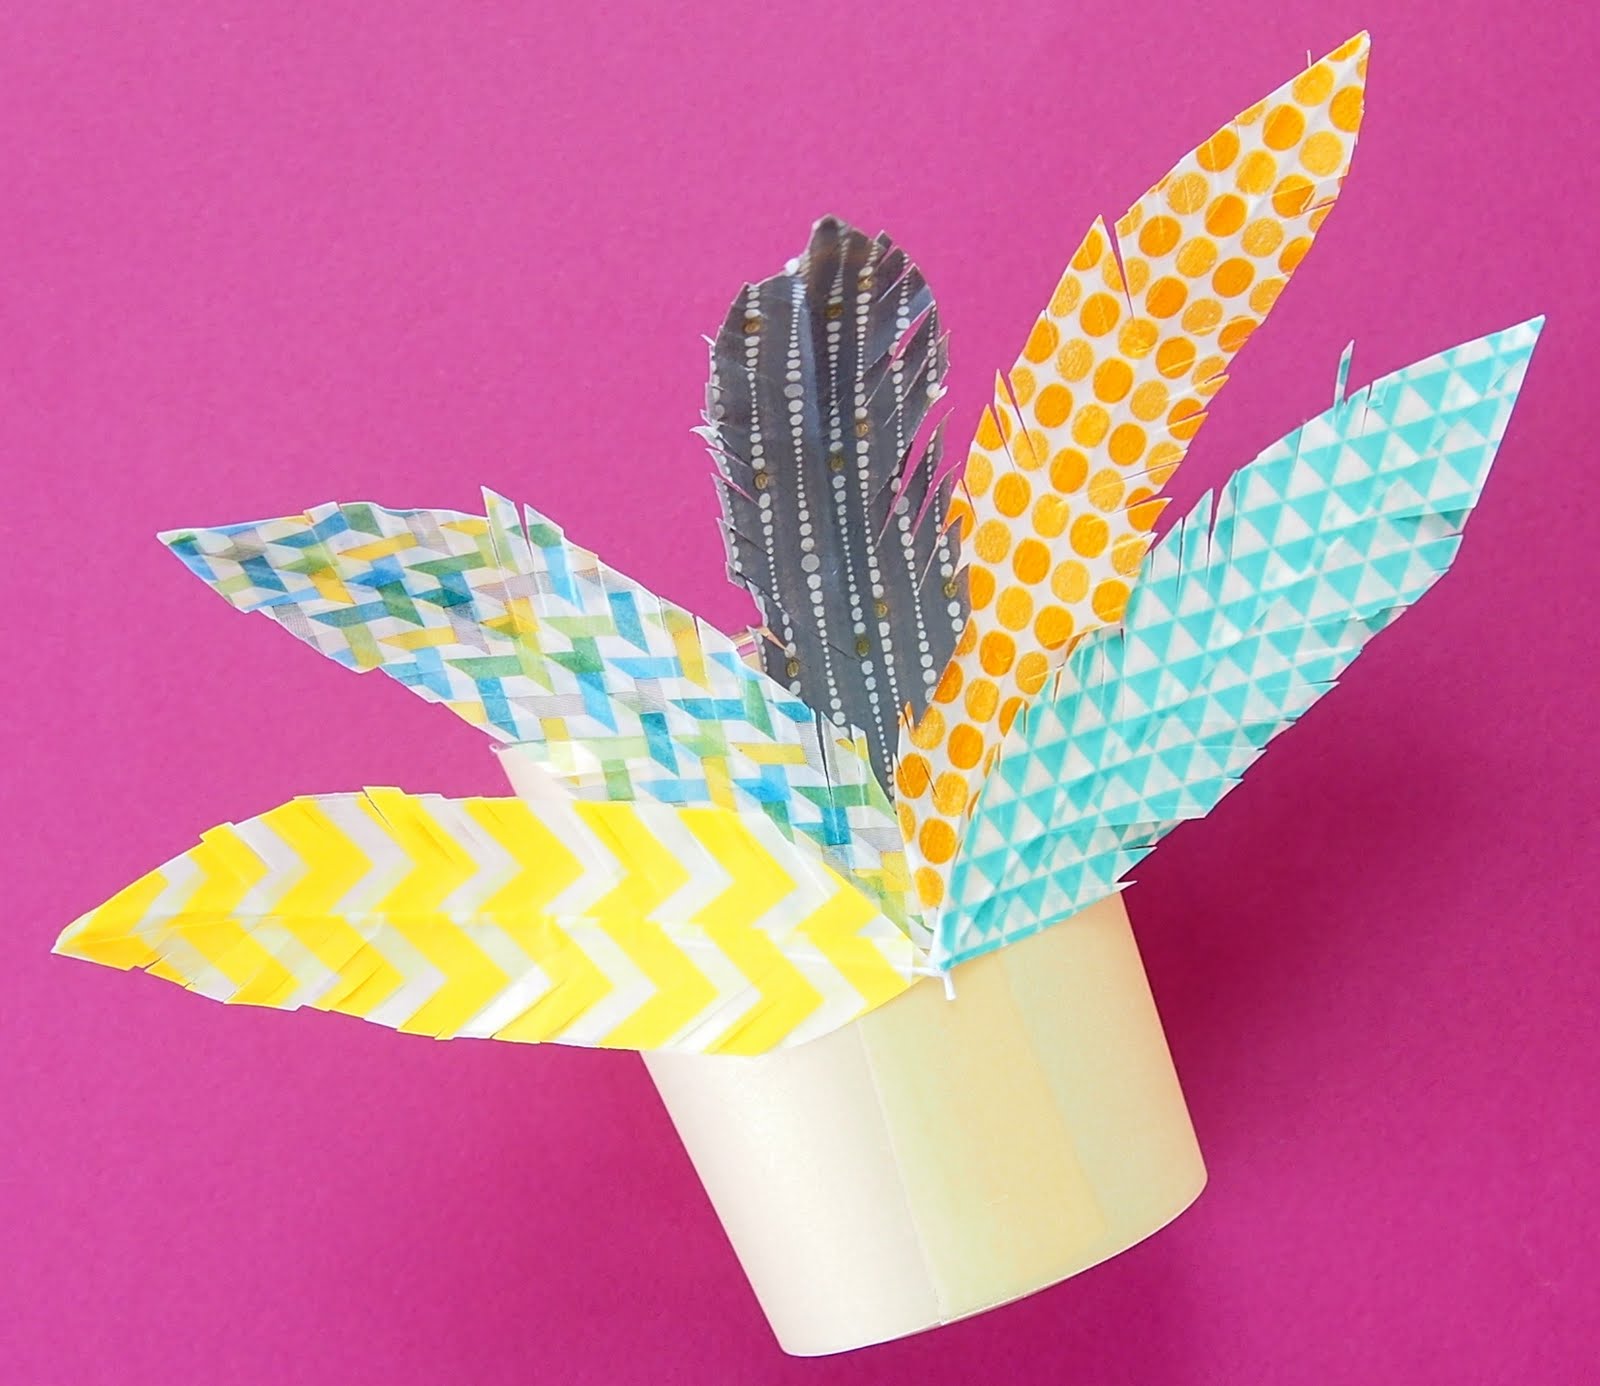
Make the washi tape feathers using 32 gauge stem wire.
There are lots of ways to make washi tape feathers.

I suggest you make as many as you can, as quickly as possible, if you're making a lot of turkey votives.
 
Here's how I made these:

Cut the floral wires in half.
Double up the washi tape widths, as most rolls are too thin to make the feathers.

You can use the parchment paper to lay  the tape strips next to each and cut them into 4" sections.

Sandwich the floral stem between the two sticky sides.
Cut angled slits with scissors (or if you have the Martha Stewart fringe scissors --this is about the only opportunity you'll ever have to use them). 
Then cut the stems off (you don't need them).

Use glue dots or double sided tape to stick each feather to the back of the covered glass. Attach about five feathers per votive.
Curve them to look pretty.

Add two small eyes, an orange felt triangle beak and a red snood--all attached with glue dots to make the turkey head.
Then add the head to the front of the votive with glue dots.
Be enthusiastic sticking the head on so it doesn't droop.


You could use wax tea lights as nothing comes in contact with the flame but if this is for the children's table, I would definitely use battery operated tea lights.


Washi Tape and Recycled Plastic Bookmarks

Did you know that March is National Reading Month? 
Anytime is reading time around here!
 
This project is the 2nd in a plastic series that is once again, inspired by our recycling bin.
 

These bookmarks are fun and really easy to make and actually, quite resilient. 

We’ve been testing them for a couple of weeks. 


Also- It’s an excuse to use washi tape – which as you can see, I store on an embroidery ring à la so many Pinterest pictures.
It’s a very functional system.


 Materials:
#1 plastic- ours is from a clear egg carton.
Washi tape
Ruler and X-acto knife or scissors
Corner punch

Cut the flat top off the egg carton and recycle the rest of the carton (or make these butterflies I made for work a longtime ago); if you’re using another source for plastic -say from a salad container, you'll need to wash and clean any paper branding off (and it might take hot water and even some Goo Gone to get the glue off off).


Cut a 1” wide by 7” long strip of plastic (a wider version is pictured here).
Apply tape to one side then trim the edges and flip the plastic over.


Stick tape to the second side, carefully lining the patterns up on both sides (so they don’t compete with one another).
    
Trim the excess tape off the sides.
The trim the sides with scissors or use a ruler and X-acto knife on a protected surface (adults job).


I really like using the corner punch to get rid of the sharp corners- you could use a scissors if you don't have a paper punch obsession like mine.
We also tried punching a hole in one end and adding a ribbon but it’s just not necessary.


You can leave sections of clear plastic too.


When I showed my friend our bookmarks, she suggested making a wider bookmark and blocking out all but one line to help a young reader focus.

When my son was little, he read using his pointer finger to help him keep place; I was told that's developmentally normal so I made one like that for the instructions here. Do you have an early reader? Would this help?