Showing posts with label adhesive jewels. Show all posts

Milk Jug Snow Star Ornaments

The Tiny Funnel
A long time ago I worked for a wonderful art director who made a stunning skirt from milk jug panels cut into circles. Ever since then I've looked at milk jugs differently. Today's ornament was inspired in part by that distant memory and a chance encounter with a really cool clock while shopping for Christmas presents and I was inspired to make these snow stars.

Materials:
Template (Click on link)

Empty clean plastic milk jug
Push Pin
Adhesive jewels
Thin marker
Scissors


Optional: nail polish remover to remove marker lines if necessary


Print and cut the template out.
Cut the top section off the jug.
Cut the handle off the jug.


Cut the 4 panels off the container.
Dry the panels if they're wet.

Trace around the template onto a panel with a fine point marker.

Cut the snow stars out with scissors.
Clean the marker off with water and paper towels (or if it's more stubborn use nail polish remover).

Use a push pin to make a hole in one of the snow star's arms.

Decorate with jewels and hang your beautiful creation!


The Tiny Funnel

The Tiny Funnel

Christmas Tree Ornaments

The Tiny Funnel

A tree for a tree! Or maybe an alternative to the mini bottle brush trees that are so popular right now.  I’m still trying to use only what I have on hand (sorry Joann's and Michael’s) and I made a beautiful mini garland last fall for a job and have a LOT of left over tulle. The key to these trees is tying, twisting and trimming the tulle.
The Tiny Funnel
Materials:
Tulle on a roll (10 yards)-I used 3” wide tulle from Joann Fabrics but you could also use 6“ wide
Pipe Cleaner- sparkly is harder to work with than regular pipe cleaners-but not impossible
Wooden bead
Decorations- Adhesive jewels, glitter, sequins etc.

Wrap all the tulle around a book or folder – I used a 12” wide folder but anything that’s around that width will work.
Cut along both edges to make 6" long strips of tulle.

Tie an open knot with the length of tulle.
Slip the loop over the pipe cleaner about 2 inches up the pipe cleaner length then tighten the loop.
Some people (like me) tie the knot directly onto the pipe cleaner and other people (like my mom) make the knot before. Your choice.

Repeat the tulle knots with rest of the tulle lengths and push the knots together every so often.
Trim the top off the pipe cleaner and make a little loop around a marker or pencil and trim off the extra.
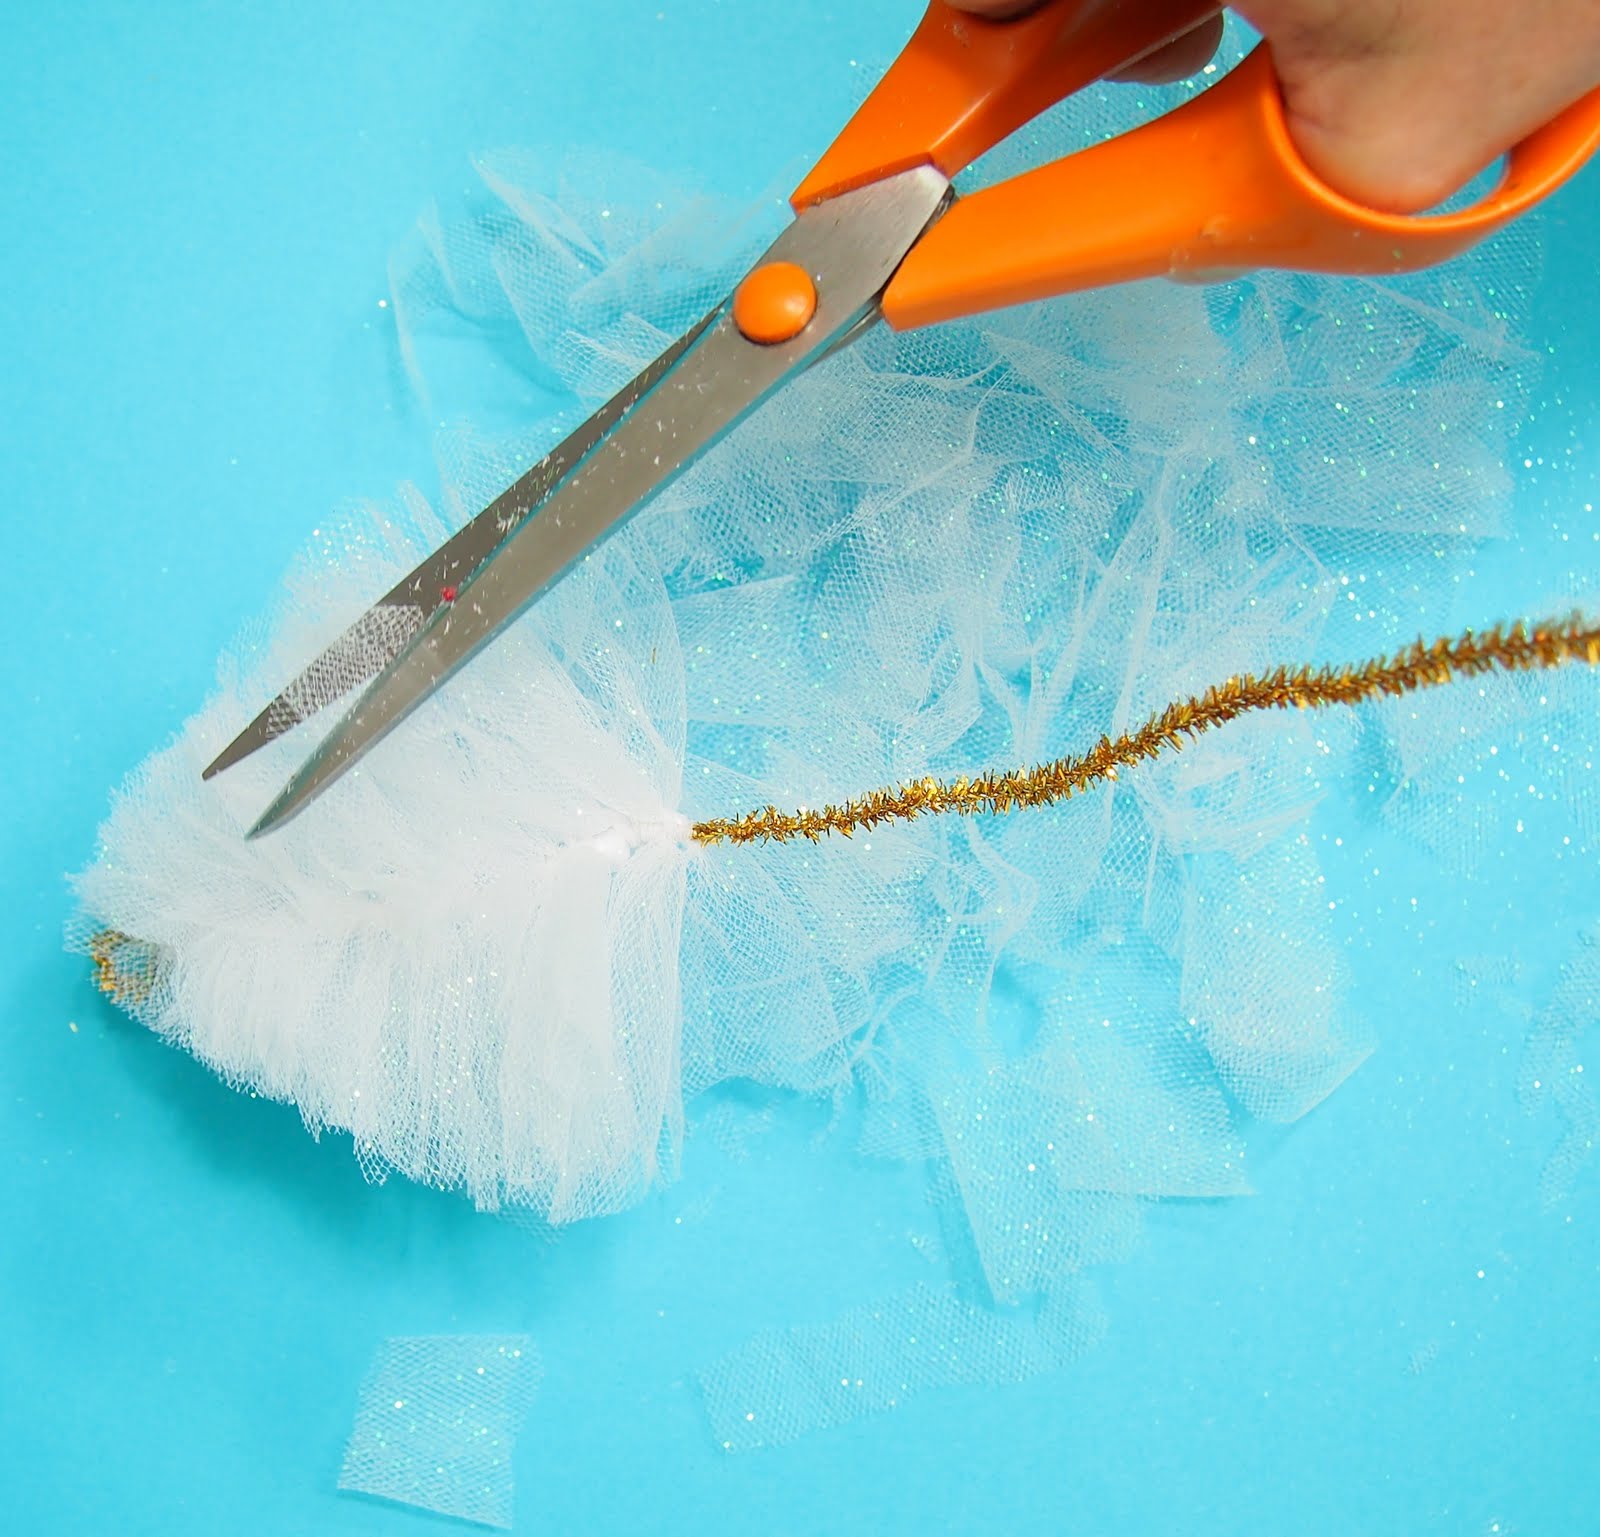
Now have fun trimming the tree with scissors- it’s like giving a poodle a hair cut (I have a poodle).
Trim the tulle shorter on the top and wider on the bottom.
Start slowly and turn the tree around as it is trimmed.
 

When the trimming is finished, trim the pipe cleaner bottom about 2 inches long and bend it until it fits in the hole of the bead (or trim it more if necessary).
The Tiny FunnelAdd adhesive jewels or sequins etc.
Here are the mini pompom tulle garlands- they were never published but I love them.
 The Tiny Funnel

Square Christmas String Ornaments

The Tiny Funnel
For today's ornament (my personal challenge to make an ornament a day using only what I have on hand) I wanted to recreate the string disks I made last year (for work) but to try them as squares-or diamonds as they hang better diagonally.

Materials:
•Bakers twine, string, Perle cotton or light weight yarn

18 feet/216 inches
•Light weight cardboard (from a white gift box or a thick paper plate)
•Plastic jewels (or sequins or pom-poms plus glue or glue dots-use what you have)
•Pinking scissors
•Push pin
•Needle 


Cut the cardboard into a 3” square with pinking scissors.
Poke a hole with a push pin in the center of the square.


Thread one end of a length of string (about 18’) through the hole.
Remove the needle leaving a 5" tail on the back to tie off later.

Wrap the string around the square starting in one corner, moving from one notch on the top and then down around to the bottom until the square is completely filled.


Tie and knot the twine off with tail.
Add a decoration (
plastic jewels, sequins or pom-poms) to the center front and back of the square.

Poke a hole with a push pin at the top of the square and insert a hanger or string loop for hanging.
The Tiny Funnel

Jeweled Star Ornaments

The Tiny Funnel
December 4th! The 4th ornament in an "ornament a day" December.
These sparkly stars are made from wire trash ties, glue dots and plastic jewels. I'm limiting myself to what we have on hand but I also found a few adhesive backed jewels (clear plastic backing) in my stash. Either way- the stars are very simple to make.


Use 4 trash ties- twist them together into a star shape.
Add the plastic jewels to the glue dots- I like the small 3/16"

Thermoweb Zots Clear Adhesive Dots, from the scrap booking section of the craft store (or Amazon-no affiliation).
Peel the jewels off the paper backing (with the glue dots attached) and add them to the star wires on one side.
Bend one tie to make a loop (after trimming off the excess paper) then trim the remaining ties.
Add jewels to the second side and line them up with the gems on the first side. 
Add a big jewel in the center on both sides. 
 
I found silver ties in a drawer-score! Festive! I used the adhesive jewels on the silver wired star- they actually peel off their backing plastic in one strip- so easy!

TheTtiny Funnel 

Christmas String Ornaments


These string disks are one of my favorite projects I made for work for Christmas this year. They may even use things you already have around the house (because everyone has adhesive jewels- right?) They're fast and easy to make and are a great idea for an ornament exchange.


These pictures were taken in July-my camera is broken! It's been acting wonky since Halloween and now the lens is down for the count.
Very sad. I have some projects planned but will have to wait to post until a fix is found.


Materials:
  • Bakers twine
  • Light weight cardboard (from a white gift box or a thick paper plate)
  • Adhesive Gems (or sequins or pom poms plus glue-use what you have)
  • Pinking scissors
  • Optional: Glitter paper/ tacky glue
Trace around a can or lid on the cardboard then cut out the disks.
Trim each disk with pinking scissors.
Tie one end of a length of bakers twine around the middle of the disk with the knot on the "back".
Wrap the twine around the disk, moving from one notch on the top and then to the bottom until the disk is completely filled.
Tie and knot the twine off at the back.
Add an adhesive gem to the front center (and the back if you like) of the disk.
Determine which edge looks best at the top and thread a short length of twine through the string in the notch and tie the ends together to make a loop.


You could also add to the "back side" with a slightly larger disk cut from glitter paper.

Glitter paper doesn't stick well to things - double sided tapes and glue dots haven't worked for me. So far- tacky glue is the only thing that has done the job.